In this post I am writting about my experience with Adafruit motor shield. This shield comes unsoldered, so first step is to solder it, for what there is a detailed explanation at ladyada web. In the same web there are code examples to use it for steppers and dc motors, and it is quite simple to use so I am not repeating it here.
I was interested in experimenting with L293D chip, compared to L298 that I have already used for the same motors (the dc motors of pirate4wd hobby car). The final purpose is to have an rc car controlled by arduino gsm bluevia shield. The results of this tests will make me decide to use L293D or L298. I can tell you right now the result: I am using adafruit motor shield (L293D) instead of arduino motor shield (L298). This is just beacuse it works better for this dc motors and with the battery I use, of course it cannot be deduced that one is better than the other in every situation.
Things that can be learned in this project:
- L293D motor driver and batteries
- Shift Register (74HCT595, the chip in the middle of the shield)
- Servo Motors: fascinating Servo library and tips about how to supply power to them.
L293D & batteries
Quadruple half H Brigge, same as double full bridge of L298. L298D has output clamp diodes incorporated (not in L298), and ouput current 600mA (1.2A peak) per channel, compared to the 2A per channel of L298, that are the most important differences.
Remembering the current consumed by the dc motors of pirate4wd car, and taking into account that motors are paired, I will need maximum 260mA per motor (520mA total as they are parallel connected) for 3V operation, and aproximately double of that for 6V operation. I couldn't find the saturation voltages for L298D in order to calculate the voltage that will rest for dc motor from motor supply, but multimeter reads about 2V between motor + and -, both for 9V battery and 4xAA battery (6V), so it should be similar to L298, between 3V and 6V.
I tried two powering options:
- 4xAA battreries, 6V total, less voltage for motor, but greater current response, dc motors run better. The capacity of each AA is between 1500mAh and 3000mAh, that will respond better to a "high" current drain of 500mA.
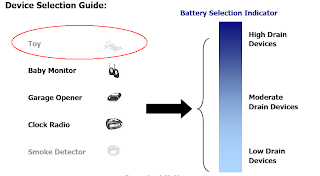
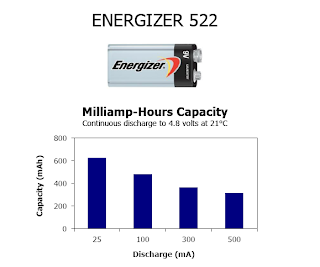
Anyway, it was a good opportunity to read and learn about batteries, I recommend this post from letsmakerobots, and reading a couple of battery datasheets, one interesting point is that battery capacity (mAh) depends a lot on the drained current in the case of alkalines, and not so much for lithium ones. For a 9V alkaline battery, with a 500mA load, battery capacity is about 400mAh, and with a 25mA load it changes to 600mAh. Another point is that not all batteries offer high currents so happily, each one is designed for a type of load, and that is something to take into account when choosing one for your motor.
74HCT595 Shift Register
Actually I made it work without knowing this chip internals, just that it was used to get 8 digital outputs from 4, so the only purpose of it is to save 4 arduino digital outputs to use 2 of them with servos, and even leave a couple of arduino digital pins free (2 and 13). Each L293D uses 4 input pins plus 2 enable controls, a total of 6, which means 12 digital outputs for 4 motors, the total of available digital pins on arduino (0-13, but 0 and 1 are serial rx and tx).
Trying to understand the board completely I searched and found this excellent deep explanation at the ladyada faqs page for this shield, it is a very interesting document for beginners such as I. Although explains it based on an old AFMotor library code that used atmega ports to manage 74HCT595 inputs, the new version of this library uses arduino pins directly and digitalWrite on them instead of dealing with atmega ports B and D registers (DDRB, PORTB).
Trying to understand the board completely I searched and found this excellent deep explanation at the ladyada faqs page for this shield, it is a very interesting document for beginners such as I. Although explains it based on an old AFMotor library code that used atmega ports to manage 74HCT595 inputs, the new version of this library uses arduino pins directly and digitalWrite on them instead of dealing with atmega ports B and D registers (DDRB, PORTB).
Servo motors & Servo Library
If you don't know how a servo works, you can read this simple introduction, or search the internet, there is a lot of info out there about it. Knowing that, servo library usage is simple and well documented, what seemed fascinating to me is the complexity of its internal management of timers to generate PWM.
The basic principle is to use atmega timers to trigger interrupts every 20ms and generate the needed pulse width at digital outputs, not so complicated, but Servo library says that can manage up to 12 servos, and atmega328p just have 3 timers, and timer0 is used for timing functions that are still available when using Servo library. Depending on the platform, the library uses a predefined set of timers, and in the case of atmega328p, it uses just Timer1 (16bits), and the cost is that we can't use PWM (analogWrite) on digital pins 9 and 10. This is because these are the arduino pins that corresponds to Output Compare Match OC1A and OC1B of Timer 1.
The way the library maps ticks to real time is using these functions located at Arduino.h:
#define clockCyclesPerMicrosecond() ( F_CPU / 1000000L )
#define microsecondsToClockCycles(a) ((a)*clockCyclesPerMicrosecond())
that takes into account the real cpu clock configured for the micro.
One thing I didn't understand completely is why 12 servos, servo signals can last from 1 to 2ms, suppose the worst case: all 12 servos are set to 2ms, that sums 24ms, and servo protocol expects a signal every 20ms (50Hz). Investigating the code and servo protocol you can see that, in that case the next interrupt will began just after last servo is served, so the frame rate will decrease that cycle to 41.6Hz, a drop of 16%, decreasing the frame rate means that servos will reduce holding power, speed and precission. Servo library uses REFRESH_INTERVAL constant (set to 20ms) to ensure the maximum frame rate, but doesn't control the minimum, just controls the number of servos per timer, what yields to 41,6Hz in the worst case, I suppose that is the maximum deviation assumed, and why the maximum number of servos is set to 12.
One important point for using servos is how to power them. In the adafruit board, servo power comes from arduino 5V (no easy way of powering from motor power inputs), and this is not adequate for my microservos. Every time I move servos arduino resets itself, I suppose beacause of a lack of power that makes brown-out detector to auto reset. In arduino UNO (atmega328p) the Extended Fuse default is set to 0x05, which sets the BODLEVEL to 2.7V, so I suppose servo drains so much current that triggers arduino Brown-Out Detector. Here is a detailed explanation of why servos should be powered from a different source that arduino.
This happens with arduino powered from USB 2.0 (500mA max load), but if I powered arduino from a wall adapter there is no problem as it drains more than 500mA (1000mA exactly, at 12V).
At the end, as I needed to power the servo in the rc car, I used one battery for arduino and another one for dc motors and servos (4xAA) connected through the ground pin to the arduino GND. I think it is a bit forced, 6V is too low for dc motors, but microservo voltage range is [4.8-6]V (datasheet), the other option was to use 3 batteries...
There is a curious conflict using Servo and SoftwareSerial libraries together that drove me mad some days. I used SoftwareSerial to access the xbee shield. The first times, once I connected the remote control and it began to send i/o samples to the xbee in the car, the servos began to move erraticaly, I though it was some kind of problem involving batteries, evil spirits and xbee draining too much at transmission time. At the end I discovered it was a software problem, beacuse the SoftwareSerial library disable interrupts when transmitting (cli();), and that interferes with the Servo library way of generating "pwm" signal, you can see here a video showing the same problem in another project. I avoided to solve the software problem and directly used Serial communication for xbee shield, but it could be a challenging project to make both libraries to live together in peace.
By the way, the servo will be used to move a platform that holds a camera that will be controlled wirelessly through the gsm shield, but that will be another day.
My code for the arduino at the car.


No hay comentarios:
Publicar un comentario